Showing posts with label basics. Show all posts

Monday, February 16, 2015

Non-Stick?

I realized this fact when a houseguest cooked breakfast and left me with a huge mess in the cast-iron pan he used and refused to clean it up. I couldn't understand why when he cooked, the food stuck to the pan, and when I cooked, the food released, and then I finally realized one very important thing.

Buy at Art.com

He was not allowing the pan to heat up before he dumped in the eggs!

Now in case you're not aware, cast-iron cookware can get very expensive, especially when you get into the antiques (many of my pots and pans are over seventy-five years old, and one is over a hundred years old).

A light in my brain went on, because we need to understand a little of materials science to cook food in cast-iron without having it stick.

When food hits a cold (even greased) pan, the raw food touches the pan, and there is the potential for sticking. But when food hits a hot greased pan, the moisture on the surface of the food turns to steam, forming a small barrier between the food and the fat. The steam (being at 212°F, or 100°C) starts to cook the food. Then the surface of the food cooks in the fat that forms the barrier between the food and the pan, before it ever touches the pan. As we all know, the texture of food changes when it is cooked. Therefore the food that hits a hot pan doesn't stick because only the finished (cooked) surface touches the pan.

So part of the key to having your supposedly non-stick cast-iron pans work properly is simply to allow the pan to heat up hot enough to cook the food while it is still empty.

If you're constantly having to clean up messes in your cast-iron cooking pots and pans, I think you'll find that they come out a lot cleaner if you try this.

Saturday, January 18, 2014

Clean Equipment Matters

I recently cleaned up after a long-term houseguest, only to discover that my range and stove (and pans) were a mess. I grew up in a scientific family, and my father was a chemist, and one of the early jobs I had as a child was cleaning glassware.

Now, we all know about chemical reactions, and anything less than squeaky-clean equipment will react with food, creating off flavors. So, when faced with a big, greasy mess (which, let's face it, happens to all of us) what do we do? And how do we keep it from happening too often?

First of all, you should clean your equipment regularly. This means not just your range top, but disassembling the range to clean burner pans, elements, and underneath the range top (on most ranges, you can lift up the top, and there will be a latch to hold the top elevated while you clean). This also means cleaning your oven. On self-cleaning ovens, you should run the self-cleaning cycle at least once a month (more if you have a tendency to be messy). I clean my range top, underneath the top, and burner pans weekly.

If you clean regularly, you will need little more than mild soap (I use Dr. Bronner, which is safe enough to brush your teeth with) and water. Some people prefer other cleaners. But what to do if your broiler or burner pan is a mess, with burned-on grease?

I discovered the answer to this last Monday, my regular cleaning day. I had run out of every other cleaner (my houseguest was pretty messy) and I hadn't made it to the store yet. So, in desperation, I pulled out a bottle of Pine-Sol original. And to my astonishment, a little full-strength Pine-Sol on a paper towel cleaned off my broiler pan so easily I could hardly believe my eyes.


Obviously, unless you are accustomed to drinking gallons of retsina, you will want to rinse everything extremely thoroughly to avoid any unpleasant reactions with food later (and it's probably not really safe to consume, anyway). But the Pine-Sol worked even on those parts of the oven that receive a few spills but are not cleaned with the self-cleaning feature. It also cleaned burner pans I thought were beyond repair, and burned-on food underneath the range top.

For weekly cleanings, a paste of baking soda (yes, that is safe to consume) and water should do the trick, or Dr Bronner will work, too. But if you've been neglecting your equipment, Pine-Sol made my greasy mess clean enough for a showroom!

Sunday, October 6, 2013

Soufflé

Soufflés, although they take a lot of work, are a great way to impress dinner guests. Some of it can be made up in advance and so your last-minute work can be eased a bit. Alternatively, if you don't mind an audience, you can start the soufflé while your guests are eating their appetizers.

Buy at Art.com
Quark Souffle, Served in a Cup
Herbert Lehmann

6 eggs
2T flour
2T butter
3/4 c hot milk
Flavourings (2 cups)
oven
Large soufflé dish
paper to make collar
Mixer
Double boiler
Whisks
Rubber spatulas
Bowls
Pastry Brush


  1. Decide what kind of soufflé you would like. They fall basically into sweet and savoury kinds, so it could be a cheese soufflé with spinach and bacon, or a spicy nacho soufflé, or a dessert soufflé such as chocolate or fruit. In any case, get your flavourings together.

  2. Now, make a roux with the flour and butter over the double boiler. Keep stirring the flour and butter together until it the butter melts and the flour begins to cook. The flour should be at least a golden-brown colour or darker.

  3. Separate the eggs. Reserve one egg yolk.

  4. Measure out your flavourings. Whatever you choose, it should equal two cups. If you wish to add some alcohol, anything from applejack to vodka, mix it in now with the flavourings. Some ideas might be au gratin potato; spinach, cheese and bacon; chicken chili; taco meat and cheese topped with salsa; beef bourgignon; chicken, asiago cheese and white wine. For dessert, try any fruit with a matching liqueur; peanut butter and jelly; or you can't go wrong with chocolate and a matching liqueur (rum, brandy, etc.).

  5. Beat together egg yolks and flavourings. Set everything aside. If it's a sweet soufflé, add 2T sugar to the egg yolks.

  6. Grease your soufflé dish. Add the paper collar and make sure it stands up 2"-3" above the edge of your dish.

  7. Preheat your oven to between 350 and 375 F. Savoury ingredients can take a little more heat.

  8. Beat egg whites until they form soft peaks (if you have very stiff peaks, your soufflé will still taste great, but it will be pretty durable).

  9. Heat milk. Mix with your roux and when you have a smooth sauce, mix it into your flavourings.

  10. Fold flavourings into egg whites.

  11. Pour gently into soufflé dish.

  12. Gently move soufflé dish into oven. Turn on the light if you wish to monitor it but do not open the door or make any loud noises.

  13. Let cook 20-25 minutes. The soufflé will rise above the top of the dish but don't worry, the paper collar will hold it in place.

  14. About 8 minutes before the soufflé is done, beat up the remaining egg yolk with a little water. Gently open the oven door. Brush the top of the soufflé gently with the egg wash, being careful not to press down on the surface. If it's a sweet soufflé, you can gently sprinkle sugar over the top and turn on the broiler.

  15. To test if your soufflé is done, wiggle it gently. It should be firm towards the edges, with a soft center.

  16. When your soufflé is done, remove gently from oven. Tug on the paper collar and it will slide out. Top if desired and serve.

  • Don't be afraid to turn your favourite foods into a soufflé. I've even had potato salad soufflé!
  • For more fun, get small ovenproof bowls with vertical sides and make individual soufflés.
  • Experiment with edible collars--phyllo dough, tortillas, piecrust dough.
  • Don't worry if your soufflé falls, or doesn't rise--it will still taste great!
Ready to try this but need something first? Try searching for soufflé recipes or equipment on Amazon.

Sunday, September 29, 2013

Perfect Pie Crust

Yes, it's been almost a year. Life happens. A lot happens.

There's a big problem with making your own pie crusts. But first, let's look at what pie crust actually is.

Pie crust is a mixture of fat and flour, moistened with liquid. But what kind of fat you use, how you mix it, what kind of liquid, and what temperature everything is, is critical to the success of your pie crust.


First off, let's start with the proportions. There should be equal parts fat and flour, and just enough liquid to make the pie crust moist enough to roll out.

Second, the kind of fat: I have found that the absolutely best pie crust is made with equal parts of lard and butter. (Come on, you knew pie wasn't good for you!)

Third, the kind of flour--yes, it does make a difference! Gluten is what makes a pie crust tough, so you want to use the lowest-gluten flour you can find. Pastry flour is the best, and for the tastiest and most attractive crust, you want unbleached pastry flour or whole wheat pastry flour.

Fourth, the temperature of everything should be ice-cold. Yes, I keep my pastry flour in the freezer if I need the absolute best pie crust.

And now we come to how you mix the fat and flour. The most reliable way I have found is with two knives. Place the fat(s) in the sifted flour, and cut through the fats with one knife in each hand. You want bits of fat the size of lentils. The flour will stick to the outside of the bits of fat. Continue until you have the entire bowl of flour and fat in the appropriate-sized pieces.

When it comes to adding the liquid, most people use water, but I have discovered that replacing some or all of the water with 80 proof alcohol works the best. You can use anything you have lying around that goes with the flavor of the pie you are going to make: rum for peaches; whisky for pecans; vodka for savory pies. This also should be ice-cold. Put the mix in the refrigerator for a few minutes to keep it cool.

Finally, let's talk about equipment. For a crisp crust, you want a dark or glass pie pan. A pastry board and rolling pin you can refrigerate is good, or you can use marble.

Dust your pastry board with at little flour as possible (I use a tablespoon and spread it out evenly with my hand, and use the leftover to dust the pin lightly). Marble pastry boards are wonderful because they always stay cool! I also have a marble rolling pin, but my mother uses a hollow glass pin that she fills with water and freezes.

Without touching the pie crust with your hands, dump it out on the pastry board and roll to 1/8-inch thickness. Put your pie pan on top of the crust on the pastry board, and invert the crust into the pie pan. Press down to make sure there is no air between the crust and the pie pan.

For perfect crimping, you can use an iced fork, or make a "v" with one thumb and forefinger, and use a knife handle to push the crust into the "v."

If you need the pie crust to bake first, without browning, put a piece of parchment paper over the whole shebang and weight it down with a few glass marbles or river stones.

As always, some experimentation is useful. I have a number of tins which make very tiny pies, and I use these for experiments until I get a desirable result, and then I bake a few more examples to perfect the recipe.
Buy at Art.com
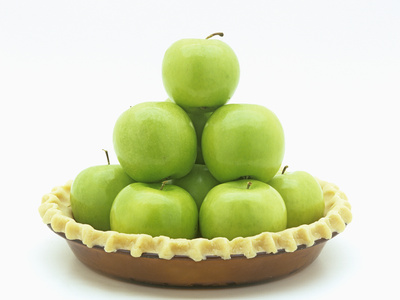
Granny Smith Apples in a Raw Pie Crust
Wally Eberhart

Thursday, October 4, 2012

Should Food, Like Martinis, Be Dry?


Many recipes for meat and vegetables instruct the cook to pat the food dry before cooking. Is this really a necessary step?

As it turns out, patting food dry removes surface moisture (no surprise here). When food comes in contact with heat, any surface moisture converts to steam. Thus, two things happen. The food, instead of contacting the heat source directly, is first steamed before it cooks with another method, even if it is only for a few seconds. If you're steaming vegetables as the first step, then, you can probably ignore the "pat dry" instruction.

Buy at Art.com
Breakfast Fry-Up
Chaloner Woods

The second thing that happens is that, as the surface moisture converts to steam, the temperature surrounding the food is temporarily lowered. For some food, it may not matter--for baking bread, for example, we add steam to the hot oven to create that crunchy crust. But if you are sauteing, stir frying, deep frying, or grilling, you will want to pat your food as dry as possible to gain the most flavor from your cooking method.

For fruits and vegetables, the best method I have found for drying surface moisture is the reliable salad spinner. For meats, I use paper towels, wrap the meat up completely, and press until the paper towel stays dry on the outside (this may require a few tries). Yes, it's an extra step, but it means much more flavorful and better-cooked food!